Saturday, September 17, 2016

Ho Ho Ho and On We ... Snowman :)

This month I'm hostessing the Ho Ho Ho and On We Sew linky party, so you've dropped by at a great time!  ;)   Ho Ho Ho is a fun party for getting organized and prepared for Christmas :)   I've written up a tutorial for a cute (I think!) project for you to try out.  BONUS - there's a prize available, and anyone who posts a project to the linky party is eligible to win it.  It doesn't have to be a snowman bag - it can be a Christmas gift, or a Christmas decoration - think Christmas prep!  :)
   
The sponsor of this month's giveaway is the lovely Stephanie at Elephant in my Handbag.  She's offering a one-off 10% discount on purchases made during the term of the September link party (00.00GMT Sept. 18 to 23.59GMT Sept. 30) using code HOHOHO - sweet!  The link to the party is at the very bottom of this post :)


The prize for the linky party winner is awesome - thank you so much, Stephanie!  One of you link party uploaders will get this adorable pattern - YAY :)


I decided, for my project, to do something that would work for Christmas, and for the winter season in general.  I hope you like it - I had great fun making it.  The first version was laughable - I had to rejig my measurements and redo it so it wouldn't look ... ummm ... doofy :D

And here he is - a fully lined snowman drawstring gift bag :)  He finished to about 10 1/2" wide x 16" tall - just right for a nice box of really GOOD chocolates ;)  He doesn't take very long to work up - and of course, you can change him up to make him work just right for you :)


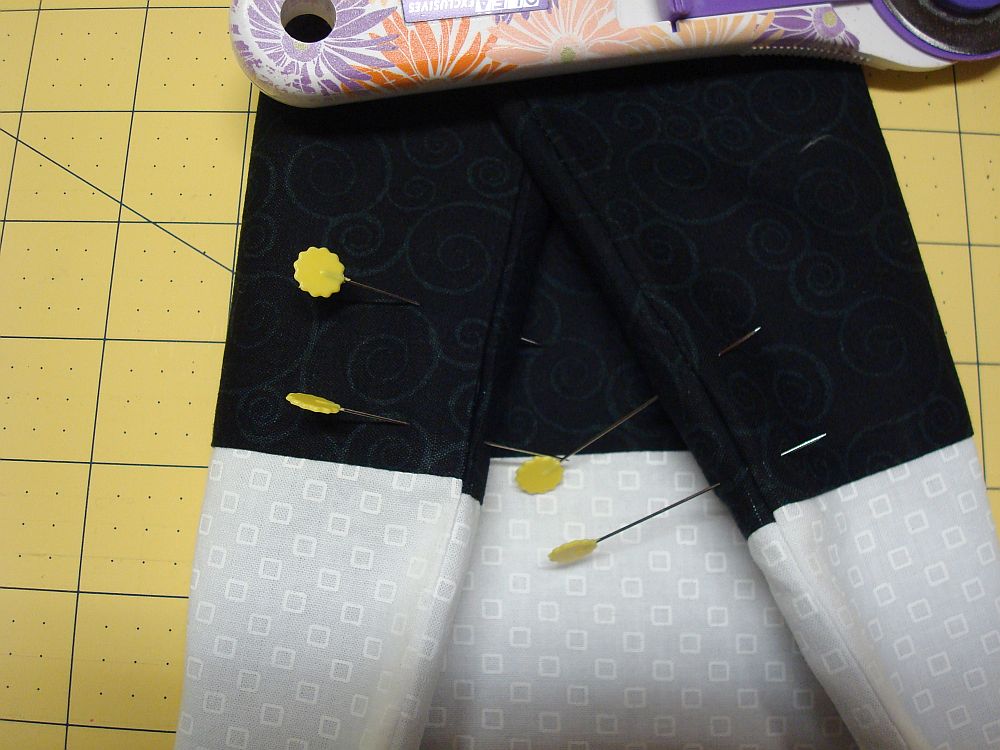
Snowman Drawstring Bag - A Tutorial :D  (measurements in inches/Imperial, listed width x height.  Seam allowance 1/4")

Ingredients:
- 2 X 11 x 12 outer main (white)
- 2 X 11 x 5 outer accent (black)
- 2 X 11 x 16.5 lining (I used grey)
- 60`` black rattail (I used 2mm) or thin cord
- scrap orange for nose - about 4 1/2" x 2"
- 7 X 1" buttons (I used all black)
- scrap of lightweight sewable iron on adhesive, about 2" x 4 1/2" (I use Heat n Bond iron-on adhesive - Sewable)
- thread - I used white, black and orange
- nose - either draft a carrot nose about 4" long, and 1.5" wide at the fattest end, or you could do what I did - I printed off the pattern from this mug rug, and enlarged it to 125% :)
- a round plastic garbage can or plate
- marking pen of your choice - I use those Frixion erasable ones

Because there so many tutorials available online I'm not going to go into detail about basic drawstring bag construction.  Instead, I'll try to show you how I snowmanified (new word :D) a run of the mill handmade bag to make it more Christmassy and Ho Ho Ho-y :D

Basically ...


Stitch outer accent to top of outer main, for both front and back.


Draft or trace a nose onto the paper side of the iron on adhesive, and iron it (follow directions on package) onto the back of the nose scrap (don't forget that whatever you trace onto the adhesive will be reversed on the right side of the fabric).

On the right side of the outside front, arrange the buttons and nose until they're the way you like them - I mark the placement with a Frixion pen and then attach the buttons and nose on top of the marks.   When placing the face pieces, leave about 2" empty on the 2 sides and the bottom, and about 3" at the top.

Remove the paper backing from the nose, iron it in place then stitch around it with orange thread with a small tight zigzag stitch.  I stitch around it twice for a nice look.  Sew the buttons in place.   You may need to carefully press the front piece a bit if it got any scrunchies/wrinkles while you were working on it.  Mine sure did, LOL.

Stitch lining pieces to outside at the top, press.  I press the seam towards the back on one piece, and towards the front on the other - it helps minimize the bulk at the seam intersection when the side seams are stitched.


Lay your front and back pieces on top of each other, RST (matching the faces at one end and the lining at the other).  Line up the corners of one end nicely.


Place the can or plate at each corner and trace around it.


Pin in a few places so the pieces don't shift.


Trim on the marked lines, then repeat on the lining end.


Layer both pieces again, RST and pin together.  You're going to stitch around the entire piece, leaving 3 openings.  Leave about 3 or 4" on a straight side of the lining to turn the bag right side out. Leave a 3/4" opening on each side seam at the black section for the drawstring:  measure and mark 1/4" and 1" up from the seam where the two front pieces are stitched together.  Do this on both sides.   If you're having a hard time picturing it, look here - step 4.  She measured up 1 1/4" and 2 1/4" from the seam - YOU will measure 1/4" and 1" because we want the casing near the very bottom of the black section, near the face.


Stitch around the entire bag, leaving the 3 openings as above.  Turn right sides out, press nicely, stitch opening in lining closed, tuck lining into bag and scootch and wiggle it around until it's seated nicely, then press it again. My curved seams were very curvy with no sharpies - I guess I didn't press very well, as I see some angles on his chin that shouldn't be there!

Stitch 2 parallel casing lines where the openings are in the black section.  I've marked the openings on either side of the accent piece with pins to make them easier to see when sewing.  If you go to the In Color Order tutorial - steps 11 and 12 explain this nicely.

Cut the 60" of rattail in half, thread each half through the casing in opposite directions, and tie off the ends so they don't escape and hide in the casing :D  I added orange pony beads to the ends of my rattail - just for fun :D  As soon as I added the ties, he ran and hid ... but not very well!  ;)

I hear that snowman like to be outside, but this is ridiculous!  :)


OK - that's it for my tutorial - I hope you like my bag, and I hope my instructions (and links to instructions) are easy enough to understand.  Give me a shout if I've missed anything, or made a goof!  If you make a bag, PLEASE please send me a picture! :)

Speaking of goofs ...  here's my first try at this project - remember I said he was doofy?  It's like he got in line 3 times when Old Man Winter was handing out foreheads.  Silly snowman!  :)

Forehead snowman :D


Before I close off, I wanted to give a shout-out to the lovely sponsors of the Ho Ho Ho linky party - they're very generous to our stitching community, and deserve a big thank you, and a visit!

https://www.etsy.com/uk/shop/nicoledebruin
  
http://www.needcraft.co.uk/
http://www.elephantinmyhandbag.com/http://www.tikkilondon.com/http://www.japancrafts.co.uk/http://www.rylandpeters.com/
 
https://www.etsy.com/uk/shop/summersville
https://www.etsy.com/uk/shop/AngieAttwoodTextiles

http://simplysolids.co.uk/
http://sewsweetness.com/

 
http://www.tina-francis-tapestry.co.uk/


An InLinkz Link-up

Posting to New to Me 2016 @ Celtic Thistle Stitches :D
Also posting the tutorial to Bag It from Elm Street Quilts tutorial linky :)

Friday, September 2, 2016

Tomorrow we're buying a fan ...

because my hot flashes are NUTS!  I have ceiling fans in most of the rooms  upstairs, but down here in the basement I have nothing, and I need to be able to cool down :D  These things are happening all day long, and I practically melt into the bed and pillow when I'm trying to sleep.  UGH!  Then there are the cold flashes, so I alternate between wearing a sweatshirt and then ripping it off, haha.  Fun times!  

A few recent finishes that I hadn't posted yet - most of these have now been packed up ready to go to Blue Hills :)

Retreat bag (I like them better without the frames)  :)

Fun and colourful froggy "use up scraps" zipper bags :)

Pineapple zippy - tutorial here :)  This one will likely be a gift - who doesn't need a purple pineapple zippy?  LOL!

Smurf Eunice bag --- 8.5" tall x 5" in diameter :) Note the Smurf charm (Ebay) - and the fabric was only $2/yard from a Walmart clearance :D  (NAYY)  
Eunice was a new to me pattern - I made her today, and will be making more, but I'll upsize them a bit.   This one was a trial run, and she worked out perfectly - she's actually giftable!  Next time around I'll add a tab at the bottom of the zipper to make it easier to zip and unzip :)  She counts as #23 in my 52 in 16 attempt :D

For Labour Day weekend in 2015 hubby and I went to a tractor pull and demolition derby in Port Perry, Ontario - we're going again this year - I do believe we have a new tradition now!  We both love the pulls and demo derbies - I have to remember to take my ear plugs because I'm not quite 100% yet after my accident, and loud noises bother me.  It's going to be a fun weekend - Port Perry is a very pretty little town, and it looks like the weather will be perfect :)

Have fun, and STAY SAFE - don't text and drive, and don't tug on Superman's cape!  ;)

LinkWithin

Related Posts with Thumbnails